Steam Cloud предоставляет простой и прозрачный способ сохранить игровые данные в удаленной системе хранения. Файлы, указанные в конфигурации Auto-Cloud или если они записаны на диск, будут автоматически реплицированы на облачные серверы Steam (с помощью Cloud API) после того, как игра появится.

Это особенно полезно, если пользователь меняет свой компьютер. Прогресс игры будет возобновлен либо облачным API, либо чтением непосредственно с диска. Файлы будут автоматически загружены перед запуском игры, поскольку вы уже ввели свои учетные данные Steam. Основная задача Steam Cloud - обеспечить синхронизацию всех файлов на всех компьютерах, которые использует пользователь.
Пользователи имеют возможность отключить всю синхронизацию с облаком, присутствующую в настройках Steam в клиенте. Пользователи также могут отключить синхронизацию с облаком для каждой игры. Но прежде чем перейти к решениям, обновите клиент Steam до последней сборки.
Каковы различные методы использования Steam Cloud?
Steam предлагает два разных метода использования Steam Cloud.
Прежде всего, это Steam Cloud API. Cloud API предоставляет ряд функций, которые позволяют напрямую интегрировать Steam Cloud в вашу игру. Cloud API также выполняет задачу изоляции отдельных файлов пользователей Steam друг от друга, а также обеспечивает лучший контроль над Steam Cloud в целом.
Второй - Steam Auto-Cloud. Эта функция была в первую очередь разработана для устаревших игр, где было сложно использовать Cloud API. Это быстрый способ начать работу с Steam Cloud, но ему не хватает гибкости и мощности, которые предоставляет Steam Cloud API.
Разработчики рекомендуют использовать Cloud API вместо Steam Auto-Cloud, поскольку он обеспечивает более глубокую и эффективную интеграцию и настройку. Это позволяет вам максимально использовать возможности облака Steam.
Как разрешить конфликт Steam Cloud?
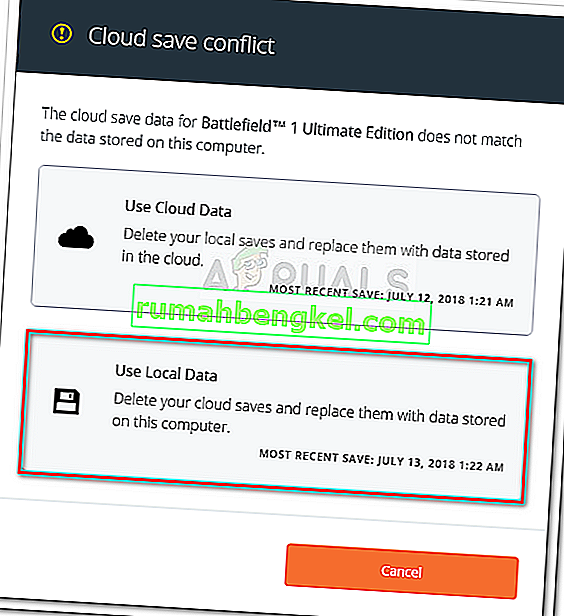
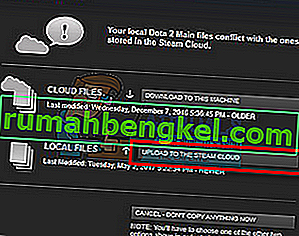
Конфликт Steam Cloud возникает, когда содержимое Steam Cloud не соответствует вашим локальным файлам игры, хранящимся на вашем жестком диске. Это может произойти на машине, которую вы использовали в то время, или могло произойти на другой машине ранее. Поскольку файл был изменен в двух разных местах без синхронизации между ними, Steam не может определить, какой файл сохранить.

Скорее всего, вы выберете файл, который был изменен последним. Это означает, что последние разработки в вашей игре будут сохранены. Вам следует внимательно изучить данные, отображаемые в окне. Внимательно проверьте дату и время контекста и сопоставьте их с последней игрой в Steam. Этот контекст может помочь вам определить, какую версию оставить.
Обратите внимание, что игра в игры в автономном режиме будет препятствовать синхронизации ваших игр, и это наиболее вероятная причина конфликта Steam Cloud.
Что делать, если Steam не может синхронизировать файлы с облаком?
Эта ошибка означает, что Steam не удалось синхронизировать ваши локальные файлы с Steam Cloud. Это может быть временная проблема, с которой могут столкнуться серверы Steam Cloud. Вы можете проверить статус Steam Cloud на сайте Steam, чтобы убедиться, что проблема на их стороне.

Если облачный сервис Steam настроен и работает нормально, это означает, что проблема на вашей стороне. Вы можете проверить подключение к Steam и устранить проблемы. Вы также можете проверить, есть ли проблемы с синхронизацией только с Steam Cloud.
Если вы проигнорируете сообщение и нажмете «Играть в игру», это может вызвать потенциальный конфликт между вашими локальными файлами и Steam Cloud. Это также может привести к потере прогресса и игровых данных.
Что делать, если я потеряю файл или перейду на другой компьютер?
Если вам не хватает вашего последнего прогресса и вы дважды проверили, что игра использует Steam Cloud с помощью настроек, это означает, что либо Steam не смог успешно синхронизировать ваши данные, либо в результате синхронизации ваши предыдущие данные были загружены в Облако.
Возможно, ваш исходный файл или прогресс все еще находится на старом компьютере и не удалось синхронизировать. Возможно, если вы запустите Steam на этом компьютере, ваш прогресс будет отображаться. Если это так, он будет автоматически обновлен на всех других машинах, связанных с вашей учетной записью Steam.
Кроме того, многие игры не используют Steam Cloud. Вы можете проверить официальную страницу игры, если доступна поддержка Steam Cloud. Если это не так и у вас нет доступа к старой машине, это означает, что ваш прогресс потерян и нет возможности восстановить его.
Как удалить файлы, хранящиеся на серверах Steam Cloud?
Steam Cloud используется для резервного копирования каждого игрового прогресса, поэтому вы не потеряете свой прогресс, если войдете в игру с любого другого компьютера. Вы можете подтвердить, что ваш прогресс сохраняется в облаке, используя следующий метод.
Проверьте, выполняется ли резервное копирование вашей игры.
- Откройте свой клиент Steam . Откройте его настройки , нажав кнопку Steam в верхнем левом углу окна и выбрав опцию.
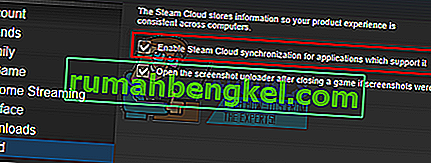
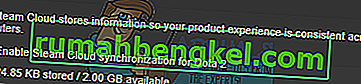
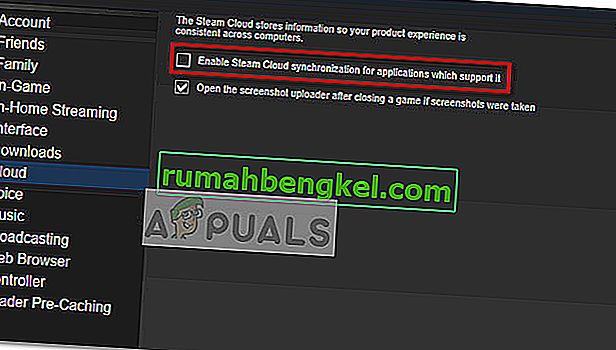
- Откройте вкладку «Облако» в левой части экрана. Проверьте, отмечена ли опция « Включить синхронизацию Steam Cloud для приложений, которые ее поддерживают ».
- Затем нажмите вкладку «Библиотека» в верхней части клиента Steam. Здесь будут перечислены все ваши игры.
- Щелкните игру правой кнопкой мыши и выберите « Свойства» . Затем перейдите на вкладку « Обновления » в верхней части окна.
- Здесь, в нижней части окна, вы увидите опцию « Включить синхронизацию Steam Cloud для [название игры] ». Убедитесь, что опция отмечена .


Если у вас включены оба параметра, это означает, что ваша игра создается в Steam Cloud, и мы также можем удалить данные.
Что такое механизм резервного копирования?
Первое, что вам следует знать, это то, что существует три версии сохраненных данных игры.
- Исходная версия хранится в папке AppData ( D1 ).
- Облачная версия хранится в папке Steam / userdata / SteamID / AppID ( D2 ).
- Облачная версия хранится на облачных серверах Steam ( D3 ).
Обратите внимание на аннотации (D1, D2, D3), которые мы использовали, поскольку в будущем мы будем часто к ним обращаться.
При первом запуске игры D1 создается автоматически. После того, как вы закончите игру, данные игры обновляются в D1 и автоматически копируются в D2. После этого D2 синхронизируется с D3, таким образом загружая весь ваш игровой контент.
Если вы впервые запускаете игру с другого компьютера, если Steam имеет D3 на своих серверах, но не обнаруживает D2 на компьютере, он автоматически загрузит данные и скопирует D3 в D2. Steam Cloud также автоматически загружает недостающие данные при каждом запуске Steam.
В двух словах, самые важные данные для нас - это D2. Если мы сможем манипулировать им, мы сможем успешно удалить данные, которые вы хотите удалить.
Примечание. В некоторых играх нет D1, и они напрямую сохраняют свои данные в D2. Хотя некоторые игры не используют D2 в качестве носителя и загружают данные в облако прямо из D1.
Что такое содержимое пользовательских данных?
В каталоге Steam / userdata у вас должна быть папка, соответствующая вашему SteamID (вы проверяете, какой у вас Steam ID, читая нашу статью о нем). После того, как вы его откроете, для каждой игры, в которую вы играете, будут созданы папки. Они будут идентифицированы по их AppID (AppID можно легко проверить, посетив игру в магазине Steam и извлекая его из URL-адреса). В этой папке с игрой вы найдете две сущности.
- remotecache.vdf: этот файл описывает все свойства файлов, содержащихся в удаленной папке.
- Удаленная папка . Он содержит все файлы, которые синхронизируются с вашим сервером Steam Cloud.
Удаление данных из облака
In this method, we will be following two important steps. We will first bring up the Steam Cloud conflict notification and then delete the Cloud files.
Do note that you would have to follow these steps game by game to delete all of the Steam cloud content.
First, we need to delete the AppID folder from your Steam directory. After you restart your computer and Steam, Steam will automatically re-create the folder. We need to perform this step to ensure that the Steam Cloud is working perfectly and we can go ahead with the part of deletion.
- Open your Steam directory. The default location for your Steam installation is
C:\Program Files (x86)\Steam
- Search for a folder of AppID and Delete it. Then restart your computer and Steam. Start a game for a few minutes. Make sure that you have a working internet connection.
- Navigate back to the Steam directory and check if the AppID folder is back. If it is, it is confirmed that your Steam Cloud is working perfectly and we can proceed with the method.
Bringing Up Steam Cloud Conflict Dialogue
The first part of the solution is probably the most difficult. To delete all your Steam Cloud data, it is necessary to bring the conflict dialogue. Without it is not possible to delete the data present in your Cloud. Steam Cloud conflict occurs when the Cloud files differ from the data present on your hard drive.
There are two methods to bring about this conflict:
Method 1:
- Make sure that your Steam Cloud is enabled by following the steps mentioned above. Exit Steam completely by ending all the processes starting with Steamclientbootstrapper using the task manager.
- Now will alter all the files in the location
Steam\userdata\SteamID\AppID\remote
The objective is to make sure that all the files are different from those uploaded to the Steam cloud. We can’t simply delete the files from this location as Steam will automatically notice that the files are missing and download the same ones from the Cloud servers. We can achieve our task by corrupting them and making them 0-byte files.
- Navigate to
Steam\userdata\SteamID\AppID\remote
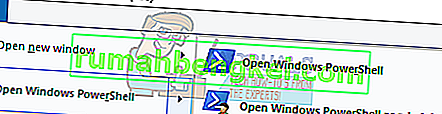
- Now hold shift and right-click on your remote folder. Select the option “Open PowerShell window here”.
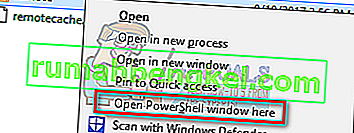
- You can also open PowerShell when in the folder by clicking the File option present at the top left side of the screen and selecting “Open Windows PowerShell as administrator”.
- Once PowerShell is opened, type the exact text written below


clc –path “C:\Program Files (x86)\Steam\userdata\SteamID\AppID\remote\*"
If you fail to write the correct code, you will get an error like this

If you correctly type in the line there will be no confirmatory message and you will get a window like this.

Start your Steam and there will be the conflict windows present on your Steam client.
Method 2:
This is an easier method as compared to the earlier one but it isn’t that efficient.
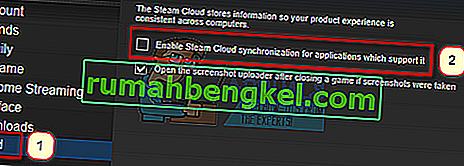
- Open your Steam client. Open its Settings by pressing the Steam button present at the top left corner of the window and selecting the option.
- Open the Cloud tab present on the left side of the screen. Uncheck the option “Enable Steam Cloud synchronization for the applications which support it”.
- Now navigate to your Stream directory as you did earlier and delete all files present in the folder of AppID. The file path for deletion is
Steam\userdata\SteamID\AppID.
- Now start the game to make new and different files in the file location.
- Exit the game and Steam completely by ending all Steam processes in the task manager (end steamclientbootstrapper first).
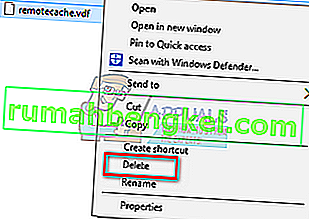
- Now delete the remotecache.vdf file present in the location
Steam\userdata\SteamID\AppID
- Start your Steam.
- Head over to the client’s Settings and enable the cloud.

Now a Steam conflict dialogue will come forth and we can proceed with the remaining method.
Deleting Cloud files
Once the Cloud conflict error is forth, don’t click any option and follow the instructions below.
- Navigate to the following file path
Steam\userdata\SteamID\AppID
and delete all the files in it. There will be two files (remote folder and remotecache.vdf). Delete both of them.
- Now go back to the conflict window and select the option of “Upload to the Steam Cloud”. Now Steam will sync your AppID folder while there will be nothing in it and the previous data on your Steam Cloud will be deleted.
- Now the game will start automatically but it will create new files that will be synced to your Steam cloud when you close it. We can prevent it from happening by pressing alt + tab. This will open the open windows on your screen. Select the Steam client from the list of windows.

- Once you are in the Steam client, open the client’s Settings. Navigate to the Cloud tab and uncheck the line which enables cloud.

- Now return to the game and exit. No files will be synced to your Steam cloud.
- Exit Steam and delete the AppID folder as we did before.


How to Make Sure If it Worked?
Remember how we checked at the beginning of this method if the Steam Cloud was running as expected by deleting the AppID folder and checking if it was made again. If there is no file present in the Steam cloud, there will be no file downloaded to your computer.
- Enable the Steam cloud as we did in the guide.
- Exit Steam completely by using the task manager.
- Delete the AppID folder (if you didn’t in step 2).
- Now check D3 (these are the cloud files) and compare them with D2 (local files on your computer). If there is nothing in D3, there will be nothing in D2 too!
- Check the following directory Steam\userdata\SteamID
No new AppID folder would have been created.
You can also check by logging Steam in on another computer and checking if the files exist.
If you make it till here without any problems, you have successfully deleted all the files on your Steam Cloud.
How to Delete Steam Cloud Saves from OS X
The procedures above can also be replicated on OS X and older Macs to a slight extent. By following the steps below, you will be able to delete your local saves. You can then disable the Steam Cloud synchronization from the Steam application, start a new game and create a few new saves. Then, when you return to re-enable the Steam Cloud synchronization features, the client will ask you which saves do you want to use. You can then choose the new ones which will delete and replace your old saves from the cloud.
To make things even clearer, here’s a step-by-step guide through the whole thing:
- Open your Steam application and go to Steam > Settings via the ribbon at the top of the window.
- In the settings menu, click on the Cloud tab and uncheck the box associated with Enable Steam Cloud synchronization for applications that support it.
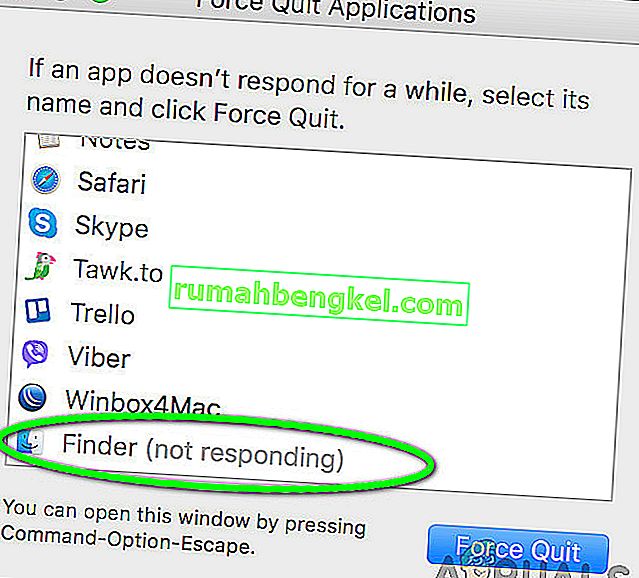
- Close Steam completely and open your Finder app.
- Go to Library > Application Support > Steam > SteamApps > Common and open the folder of whichever game you want to delete the save files.
- Next, open the SAVE folder to reveal the saves of the game.
Note: If the location specified above doesn’t land you to the save files, try the following locations but mind the placeholders:
Users / *Your username* /Library / Application Support / *Game Folder* / Game Documents / *Game* / GameSaves Users/ *Your username* / Library / Application Support / Steam / userdata / *GameNumber* / remote Users/ *Your username* / Library / Containers / *Game Folder* / Data /Library / Application Support / *Game* / GameDocuments / *Game* / gamesaves
- Once you manage to identify and delete the local saves from the game you’re targeting, open the Game and create a few new saves.
- Exit the game, open steam and return to Steam > Settings > Cloud. From the cloud tab, re-enable the checkbox next to Enable Steam Cloud synchronization for applications which support it and click the OK button below.
- Steam will ask you whether you want to use the newly created local saves or the ones that you already have on the cloud. Choosing to use the new ones will delete the old saves that you currently have on Steam Cloud.